ARO MINA MKI project (USA) - Plongée sans sel


Menu principal :
- Accueil
-
Mises à jour & liens
- juin 2023
- avril-mai 21
- janv.-fév 20
- janv.-fév 19
- sept.-oct. 17
- juillet-août 16
- mai-juin 16
- mars-avril 16
- janv.-fév. 16
- nov.-déc. 15
- sept.-oct. 15
- juillet-août 15
- mai-juin 15
- mars-avril 15
- janv.-fév. 15
- nov.-déc. 14
- sept.-oct. 14
- juillet-août 14
- mai-juin 14
- mars-avril 14
- janv.-fév. 14
- nov.-déc. 13
- sept.-oct. 13
- juillet-août 13
- mai-juin 13
- mars-avril 13
- janv.-fév. 13
- nov.-déc. 12
- sept.-oct. 12
- juillet-août 12
- mai-juin 12
- mars-avril 12
- janv.-fév. 12
- nov.-déc. 11
- sept.-oct. 11
- juillet-août 11
- mai-juin 11
- mars-avril 11
- janv.-fév. 11
- nov.-déc. 10
- sept.-oct. 10
- juillet-août 10
- mai-juin 10
- mars-avril 10
- janv.-fév. 10
- nov.-déc. 09
- sept.-oct. 09
- juillet-août 09
- mai-juin 09
- mars-avril 09
- janv.-fév. 09
- nov.-déc. 08
- sept.-oct. 08
- juin-juillet-août 08
- avril-mai 08
- fév.-mars 08
- déc.-janv. 07/08
- oct.-nov. 07
- août-sept. 07
- juin-juillet 07
- avril-mai 07
- un jour de Web
- shop
-
Découvertes
- avant-propos
- le site
- contact
- informatik
- homo sapiens
- rencontres
- remerciements
-
ex libris
- God save la France
- Désert américain
- le marché de la faim
- 1952, l'expédition alpine oubliée
-
BD, la grande passion
- avant-propos
- La marque jaune
- Le mur de Pan
- Le temps des Lumières
- Universal War
- Le journal de mon père
- Paroles de poilus
- Tango pour un Berliet
- Le photographe
- Pyongyang
- Colt Walker
- Une vie chinoise
- Des nouvelles d'Alain
- L'art vulgaire
- Les longues traversées
- Tintin, on a marché sur la Lune (1954)
- René PELLOS (1900-1998)
- Le pilote aux 2 visages (2012)
-
voyages sur la Terre
- préambule
- Marine-Ehrenmal, Laboe (D)
- le Maroc
- Languedoc
- Bourgogne
- Rome
- 09 - Ariège
- vol de cartes
-
pays du Léman
- intro
- Genève
- Vaud
- Valais
- à voile et à vapeur
- mobilité douce
-
modélisme
- avant-propos
- Atom XB
- camionnette Ford V8 1934 "Longines"
- Kyosho Inferno VE
- Kyosho ZX-5
- aviation
- grenier des objets inutiles
- pamphlet
- société de merde
-
Plongée
- avant-propos
- souvenirs...
- la Spiro
- ex libris
- coups de gueule
- informatique Tok
- salon de la plongée
- musées océanographiques
-
plongée lac & rivière
- intro
- ex libris
- Rhône (CH)
-
Léman (F/CH)
- avant-propos
- bon sens ?
- passé lacustre
- poubelle
- Reposoir (GE)
- Montalègre (GE)
- Montalègre 27juin2012
- Montalègre 28.04.13
- crépine des SIG (GE)
- Hermance (GE)
- Hermance 2.3.08
- Hermance 30.3.08
- Hermance 15.11.09
- Hermance, essai UV26 19.09.10
- Hermance, noyez Joël 2010
- Hermance, 17jan2011
- Hermance, réveil 5/11
- Hermance 22avr2012
- Hermance 10juin2012
- Hermance 4 fév. 2103
- Hermance août 13
- Hermance oct..2013
- panorama du Grand-Lac
- carrière sub Founex (VD)
- Morges
- Lutry
- Rivaz-gare (Vaud)
- Rivaz-moulin (Vaud)
- Hirondelle (Vaud)
- Hirondelle en Forel (Vaud)
- Hirondelle, 7.2.2009
- château de Chillon (Vaud)
- avion de Tougue, août 15
- l'Andalouse (F)
- l'Andalouse - 26.09.10 (F)
- Andalouse juillet 2013 (F)
- l'Andalouse en Triton, juin 2014
- barge d'Yvoire (F)
- bloc erratique de Corzent (F)
- St-Disdille (F)
- St-Disdille 2, le canot
- St-Disdille, 9.3.2008
- St-Disdille, naufrage de la Fraidieu
- Evian, l'Hydronaute (F)
- Evian, barrque à -13m
- Evian, canot à -46m
- Lugrin, débarquadère (F)
- Meillerie I, la carrière (F)
- Meillerie I - 25/9/09
- Meillerie I - 16/5/10
- Meillerie I - 1/08/11
- Meillerie II
- Meillerie II, plongée "zen"
- Meillerie II, l'omblière
- Meillerie, tombant sans nom
- Meillerie II, nov. 2014
- Meillerie, tombant de la Vierge
- Locum, la Neptune (F)
- 19.06.11, s/marins MIR
- lac de Neuchâtel
- Duzillet (CH)
- lac de Joux (CH)
- Valais (CH)
- Arnensee (CH)
- Areuse (CH)
- Constance (CH)
- Lioson (CH)
- Hongrin (CH)
- Thun (CH)
- Verzasca (CH)
- val Maggia (CH)
- Vouglans (F)
- Le Frasnois (F)
- Annecy (F)
- Bourget (F)
- Valserine (F)
- Languedoc (F)
- Roussay
-
plongée mer
- avant-propos
- Martinique
- France
- Thaïlande
- Sardaigne
- Egypte
- Papouasie
- naufrages
-
plongée tek
- intro
- 1 ordi air + 1 trimix, un luxe ?
- are you DIR ?
- certificat médical
- inflation matériel
- compresseur Coltri MCH6
- nitrox & mélangeur
- tovaritch booster O2
- booster Haskel mini sport
- booster pascalien 2014
- trimix
- héliox
- plongée vintage
-
plongée spéléo
- avant-propos
- ex libris
- quel avenir ?
- photographie souterraine
- calculateur JP Couloumy
- Baume des anges (F)
- Denée (B)
- Font Estramar (F)
- Fontaine des Romains (F)
- Fontaine de Vaucluse (F)
- Goul de la tannerie (F)
- Goul du pont (F)
- le Groin (F)
- la Marnade (F)
- Ressel (F)
- St Sauveur
- Yucatan (MX)
- Sardaigne (I)
- ballade en Languedoc
- plongées insolites
- plongée solo/duo
-
matos à "bibi"
- intro
- bi 2x10l
- kit bi rapide
- sangles inox de palme
- boucle inox de stab
- détendeurs
- ardoise high tek
- casque spéléo
- Aqualung SEA LV-2
- ROV en kit
- harnais
- ordinateurs trimix
- bateaux
- compresseurs & boosters
- scooter
- moulinets
- éclairage-chargeur
- lutte contre le froid
- bricolages
- bêtisier
- entretien courant
-
collection
- avant-propos
- plongeur P.I.R.
- images vintages
-
Ex libris
- Paris Match, août 1953
- comics (France, 1956)
- magazine Skin Diver (USA, 1961)
- La Plongée MN (1967)
- Skin diver Bible (USA, 1968)
- San Antonio (1968)
- le "Molle" (1972)
- Il libro del sub (1977)
- La plongée et l'intervention sous la mer (1977)
- L'école de plongée par l'image (1978)
- Poseidon, plongée en DDR (1962-1991)
- Le matériel de plongée sportive (1988)
- the Wakulla springs project (1989)
- plongée en URSS
- Le temps des pionniers (1999)
-
accessoires
- palmes GODEL "Propuls"
- palmes Swimaster UDT Duck_Feet (USA, 60-70')
- masque rétro
- bi & Fenzy
- vieux sac Spiro
- anciens gants
- Subatec S180
- montres
- Citizen Ecodrive Bn0000-04H
- Casio G-Shock DW-9052
- Promaster Citizen
- SEIKO MM 300
- Citizen Aqualand Promaster JP2004-07E JP2004
- fifty_Fathoms_jan2012
- profondimètres divers
- profondimètres Spiro
- bottom timer Princeton Tectonics (1978)
- profondimètre russe G5 (1983)
- ardoise civile maison (2014)
- ceinture à godets
-
scaphandres
- tri bouteilles Nemrod
- RC35 (1935)
- MC39 (1939)
- Raid Technisub 1970
- détendeur MATTER
- bi 2x6.8L Marine Nationale
- détendeurs
- bouées & stab
-
instruments de décompression
- histoire des instruments de déco
- décompressimètre SOS (1958)
- EDGE (1983)
- Decobrain (1983)
- Skinny Dipper MarkII (1986)
- Suunto SME-ML (1986)
- Uwatec Swiss (1987)
- Micro Brain (1988)
- Aladin Pro (1989)
- Monitor I (1989?)
- Scubapro ADONIS (1989)
- US Divers Scan4 (1995)
- Monitor 2+ (1995)
- Océanic Datamaster Sport (199?)
- scaph & Cie
- ZP 10, protection NBC
- bonnes adresses
- aqua-dollars
-
Recycleur
- accueil
- Index
- avant-propos
- A vendre
- accessoires pour plongeurs solitaires
- ex libris
- de profondis in memoriam
-
sécurité & bailout
- redondance
- blocs carbone
- BOV JJ
- BOV Golem
- lestage
- calculateur Excel de mélange
- spéléo en recycleur
- réunion PUF
- la chaux
- entretien
-
contrôler sa PpO2
- Avant-propos
- Dräger oxygauge
- AirZO2 + Oxy2
- VR3 + cellule O2
- HS Explorer Ppo2 meter
- sac de calibration
- cellules O2
- contrôle Ppo2 de l'EDO
- contrôle Ppo2 du rEvo
- les projets
- 1920 Fenzy-Fernez
- masques faciaux ARO
- ARO: que faire si vous êtes malade ?
- armement s/marin
- 1930 Salvas
- 1950 ИПСА (IPSA)
- '50 Pirelli 'Poseidon'
-
1955 Fenzy DC55
- type
- la machine
- test
- gonfleur gonflé oct.14
- DC52, le prototype
- DC55 vert ancien
- démontage d'un "ancien"
- iconographie_07-16
- plongée DC55
- la machine
- modif's
- Fenzy 55
- 1957 Cressi 57b
-
1957 Fenzy Oxygers
- type
- Oxygers 57
- Oxygers 57/97 (1997)
- Oxygers années '60
- accessoires
- Oxygers + boucle OMG
- gag
- iconographie
- plongées Oxygers 57
- 1959 IDA59
- 1960 Cressi SUPER ARO
- 1963 Fenzy 63-66
- 1968 Fenzy PO68
- 1970 RGU-FM
- '70 Cressi Sub
- '70 OMG Super ARO
- '70 OMG MKI
- '70 Nuevo ARO Technisub
- '70 LAR V/MK25
- 1972 FGT1/D
- 1978 Mixgers78
- 1983 ARAK M-83 "Drina"
- 1988 Naubos88
- 1988 COMEX BOSS 2
-
1995 Dräger LAR VI
- type
- plongée LAR-VI
- 1997 FIENO
- 1997 OMG MK2C
-
1998 Dolphin Draeger
- type
- préambule
- le filtre
- du scr au ccr...
- scr v0.1
- scr v0.2
- ccr-smg v1.0
- ccr-kiss v1.1
- ccr-kiss v1.2
- ccr-kiss v2.0
- ccr-kiss v3.0
- v3.0 à Hermance
- accus s/harnais
- sac percé ?
- fixation stab
- coque camouflage
- accessoires
- spéléo panzerienne
- plongée panzerienne
- vidéos
- 2000 MKII
- 2002 Castoro C96 OMG
- 2005 RB-00
- 2005 ARO en pvc
- 2007 projet 'XS'
-
2007 rEvo II
- accueil
- avant-propos
- j'aime/pas
- rEvo version Ti
- commande puis attente
- présentation générale
- coque inox
- les blocs
- injection O2-diluant
- surcompensation DS4
- tuyaux MP courts
- les 2 filtres
- éponge absorbante
- vidéo: les filtres
- vidéo: les maxi filtres
- contrôleur de Ppo2, le rEvodream
- accessoires sur les flancs
- la stab
- made in 'Ray'
- réglage soupape
- pièces détachées, mon stock
- barre de distribution MP
- tuner sa machine
- BOV JJ-CCR
- rEvo et DSV du Dolphin ?
- Kit WOB II
- plongées rEvo
- spéléo en rEvo
- vidéos rEvo
- fin de l'histoire
-
2008 EDO 08
- type
- EDO-08
- le filtre
- chassis inox
- embout Airtess
- tuyaux
- protection des tuyaux
- tête
- contrôleur Ppo2
- portage latéral
- portage dorsal
- EDO V.2
- EDO en plongée
- vidéos
- EDO V.3
- 2011 LARD-V
- 2011 projet IDOX
- fabriquer son filtre radial
- 2011 monster-ARO
- 2011 ARO Dakine
- 2014 Salamandre
- 2015 Salamandre Cordura
- 2018 Salamandre
-
CCR & Cie
- avant-propos
- Joky de Michel
- Panzerdolphin de 'Phil'
- mSMG Dolphin de Viviane
- ZP-10, une drôle de machine
- essai Sentinel 2/4/09
- Thun Tec event - essai JJ-CCR 20/2/11
- essai Ouroboros 3/6/2012
- ARO MINA MKI project (USA)
- essai Triton 21/10/12
- salon de la plongée Paris 2013
- Combo'O2 SUBMATIX
- MDP days 2014
- Sion, les ìles septembre 2014
- essai MK16 "mini" nov. 2014
- CODE3
- sortie FROG 05.2015
- sortie FROG à Roussay, juin2015
- Sion, les îles 2015
- construire sa machine ?
- recycleur & kayak ?
-
Photographie & vidéo
- "lumière !"
-
ex libris
- 100 ans de photo sub
- Jim CHURCH
- Marcel IMSAND
- n & b
-
matos terrestre
- intro
- numérique
- Objectifs
- mini studio
-
photo sub
- accueil
- photo en lac
- macro
- Portfolio sub
-
matos sub
- avant-propos
- Nikonos
- caisson Hugyphot
- caisson Subal
- caisson Ikelite + Inon UFL-16AD
- caisson IKELITE Nikon D700
- éclairage vidéo
- vidéo sub
-
collection
- avant-propos
- ex libris
- Pentax spotmatic
- Kodak Brownie T.
- Kodak Brownie 2
- microscope Leitz
- Formaplex
- Calypso & Nikonos
- Subawider III
- caisson 8mm Hugyfot
- Sea&Sea MX-5
- Sea&Sea MX-5 II
- Nikon AW AF
- Minolta 35DL
- Hanimex AMPHIBIAN 110 MF
- Agfa Isola II
- Canon Ixus Z50
- Nemrod "Siluro"
- Eumig-Nautica
- Fairchild K-20 (1941-45)
- ex nihilo imagines
- infini de l'espace
- Occitania
- Genève
- Militaria
- avant-propos
- Joky de Michel
- Panzerdolphin de 'Phil'
- mSMG Dolphin de Viviane
- ZP-10, une drôle de machine
- essai Sentinel 2/4/09
- Thun Tec event - essai JJ-CCR 20/2/11
- essai Ouroboros 3/6/2012
- ARO MINA MKI project (USA)
- essai Triton 21/10/12
- salon de la plongée Paris 2013
- Combo'O2 SUBMATIX
- MDP days 2014
- Sion, les ìles septembre 2014
- essai MK16 "mini" nov. 2014
- CODE3
- sortie FROG 05.2015
- sortie FROG à Roussay, juin2015
- Sion, les îles 2015
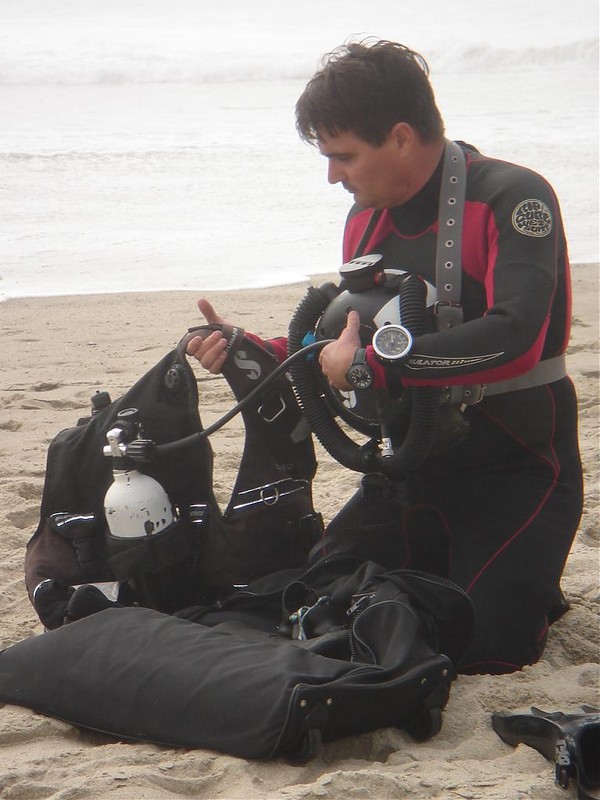
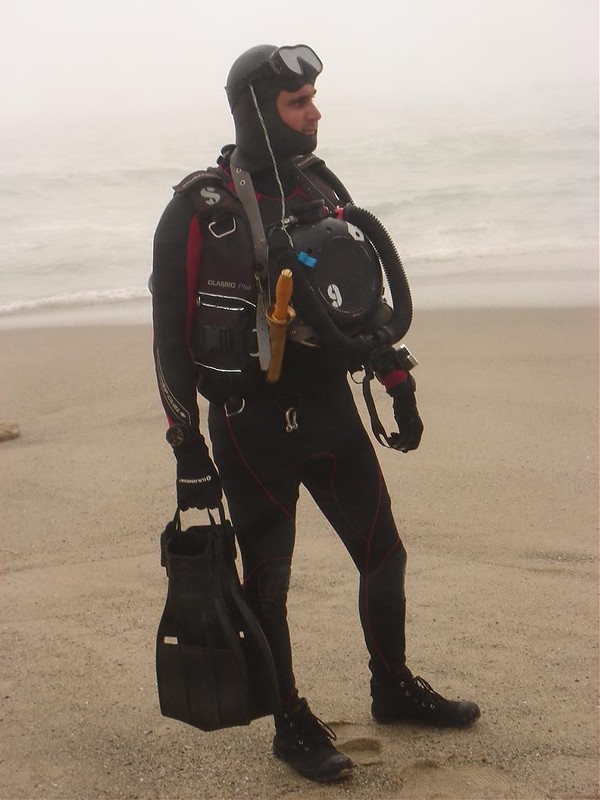
ARO MINA MKI project (USA)
Un projet que j'aime vraiment beaucoup...
RBW 2007
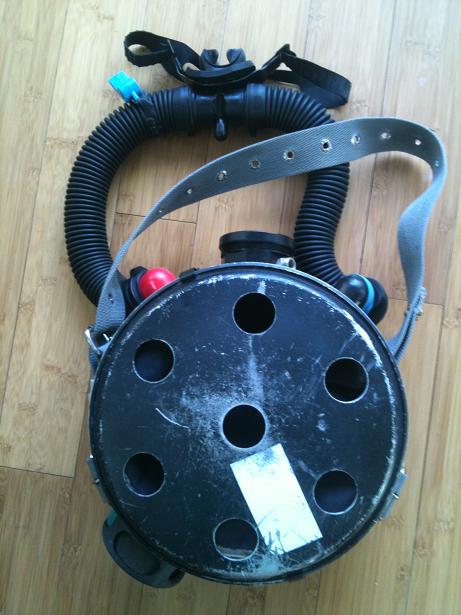
MINA MK I MOD I DUAL PURPOSE REBREATHER
What follows here is a lengthly description of a new type of rebreather that is being dove and tested here in California. I tend to be a bit long-
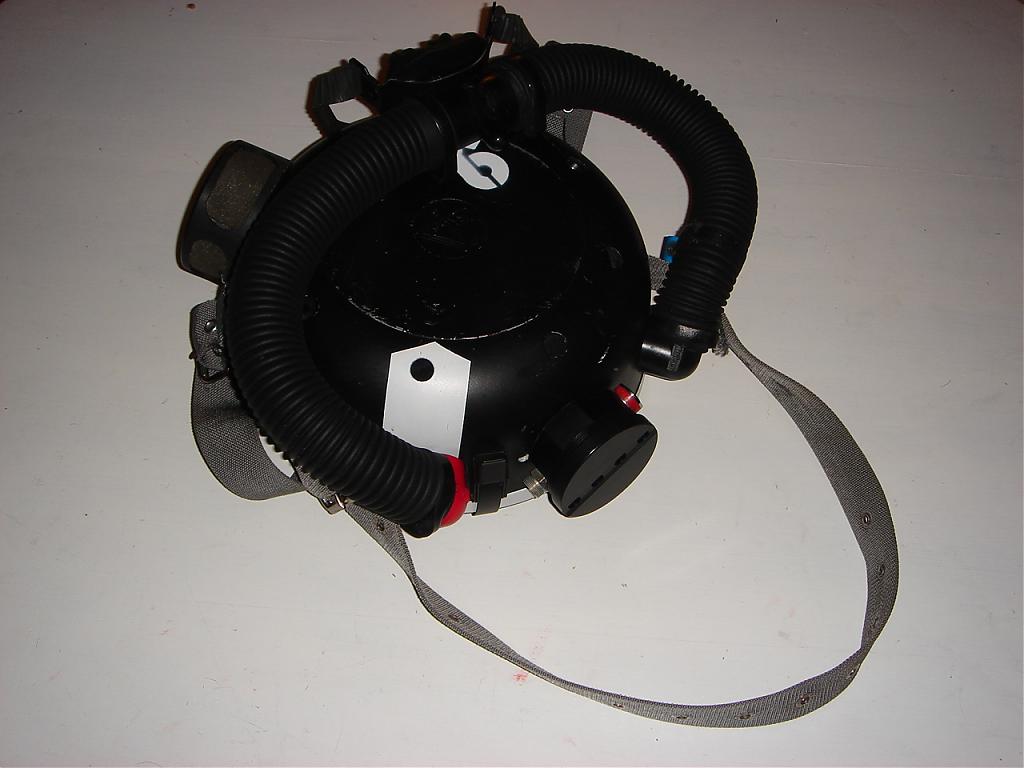
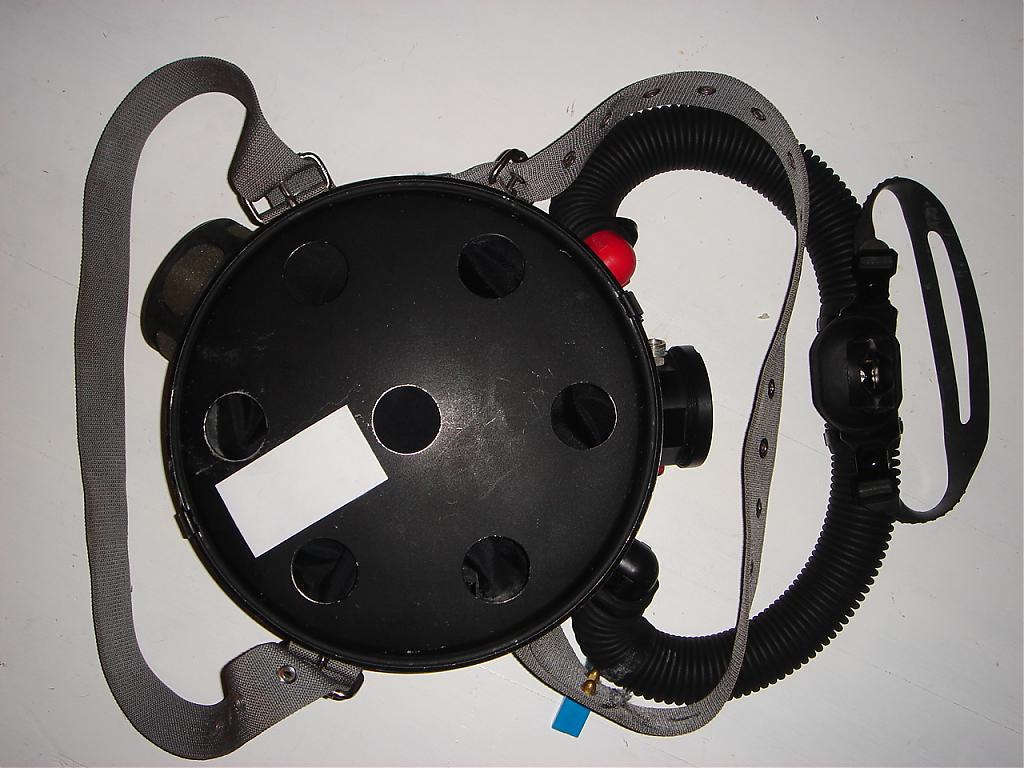
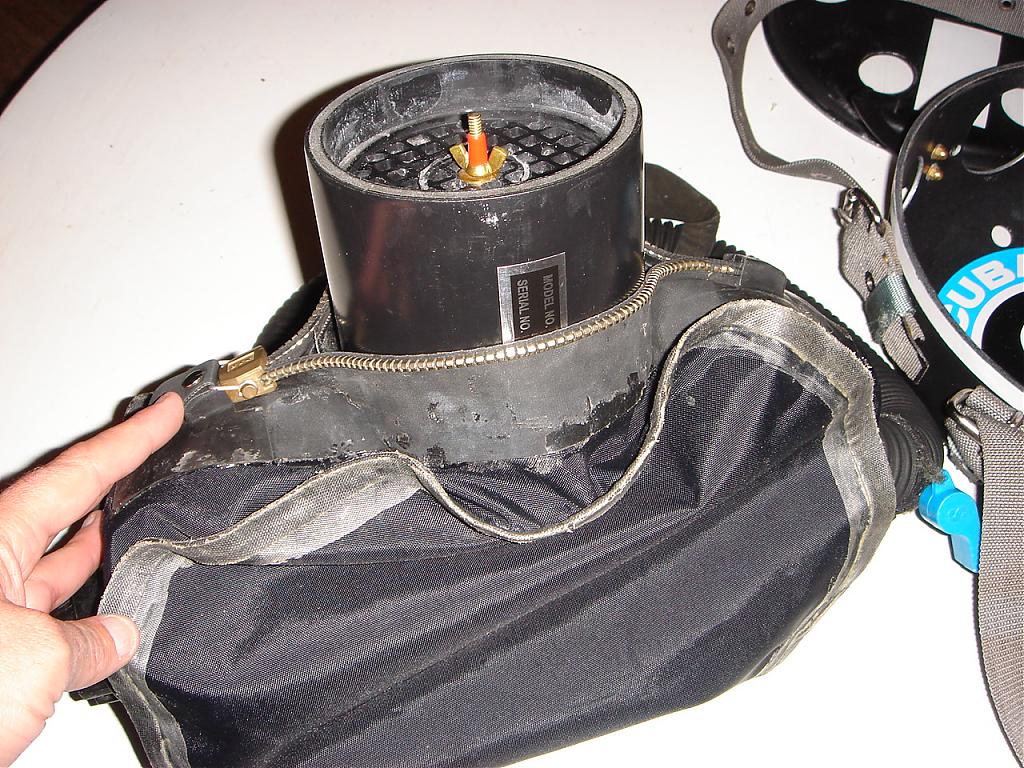
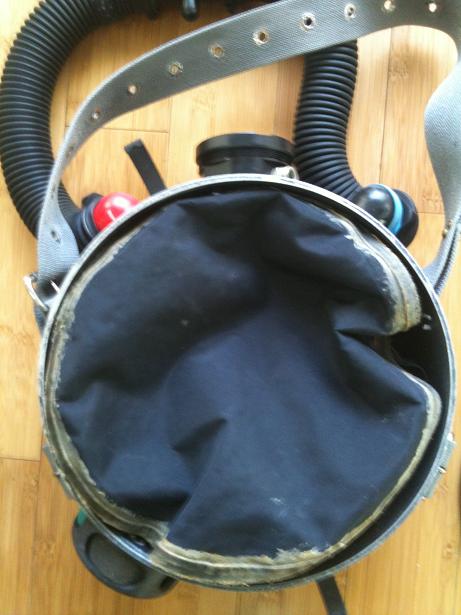
This rebreather is unique in several ways but it is principally different from other units in that the scrubber was designed to be inserted INSIDE the counter lung and is accessed via a drysuit zipper. The reasons why it was done this way will be described below.
WHY WAS THE THING BUILT?
This rebreather was designed for divers wishing to dive to a maximum depth of 130 FSW for up to one and a half hours at a time and who want the minimal of equipment but still want to be safe doing it. It was also designed for divers who would like a pure oxygen rig for diving in the shallows. It has been dove in this mode several times to date. It will soon be a mixed gas manually controlled unit for going deeper than 21 fsw; I am waiting for the money to buy the electronics and the CMF valve. It has not been dove past 21 feet as of yet. Lastly, it may be an excellent bailout rebreather because it is so small and lightweight and can be used with almost any BC/harness that is available on the market today, or yesterday.
The MINA can fill the above roles quickly and easily because it was designed to be versatile and modular requiring no tools to change from one type to the other-
My buddies and I like to dive but we are also very intrigued by the technical side that rebreather diving offers and weve spent hours debating what rebreathers, both past and present, are the best and why we feel so. What is the best rebreather? In my mind, its the one that serves your needs the closest and allows you to dive where you want to dive, safely.
I enjoy diving pure oxygen rebreathers down to 1.6 ATM because there is so much to see in the shallow depths along the coasts. Sea life flourishes in the sunlight that penetrates to 20 feet and there is a never ending shoreline to explore in every ocean and lake. Also, I never find myself too far from dry land and this adds to the safety of this type of diving. However, being a diver of some 24 years I also know that I have a desire to go deeper on a regular basis, too. A rebreather that can perform double duty here is what I would like. Small size and low weight are important because we tend to walk long distances along the shore to enter the water. Give me a light and compact rebreather any day over a heavy and bulky one. A robust rebreather is important for me because I dive in shore break conditions and also because Ive found that the garage monster has an appetite for my diving gear as does the trunk monster. Price is always a concern for me even though I hold down two jobs here in the good old (expensive) O.C.
I have owned and dove several military units in my time and I like them, especially the front-
The MINA is a front-
The disadvantages are that some divers ears may bother them because of the pressure differential between the eustachian tubes and the lung. It can be more difficult to get into a boat from the water without a ladder unless you remove the rebreather. Clamoring up onto rocks to get out of surf can be harder and, as was mentioned, you've got equipment on the front of you when you may wish to be uncluttered there. Lastly, if the rebreather is too heavy it can really reek havoc on your neck if you have to walk long distances along the shore to your entry/exit spot. I addressed this problem by mounting the bottles/valves/first stages on my back.
For those of you still unconvinced the Mina MK II back mount rebreather is being developed as we speak. The MK II will be larger with a 16" diameter case whereas the MK I front mount, discussed here, utilizes a 12" diameter case. The MK II will have a larger scrubber and therefore longer duration. Otherwise, the two types will be virtually the same.
WHY IS THE SCRUBBER INSIDE THE LUNG?
I went home and started spending hours drawing countless loop designs in an effort to try and make a loop that was more compact than what was already available without sacrificing good, low WOB characteristics. I tried keeping in mind that every piece I drew had to be readily available at Lowes, Home Depot, the local hardware store or from the diving equipment manufacturers. I put the scrubber on the back, front, sides, top and bottom. I put the lung on the back, top, sides and bottom. I tried to eliminate the hoses. I tried to shorten the hoses. I drew square lungs, round scrubbers. I drew round scrubbers and square lungs. I tried to eliminate the 2nd stages. I tried to combine the second stages. I tried to make sure that whatever I drew would somehow be compatible with buoyancy compensators that are readily available. On and on it went for three months until one day it dawned on me, like a bolt of lightning: put the scrubber inside the lung and the loop will be more compact. Put the scrubber inside the lung and it will operate as efficiently as possible, due to its being insulated completely from the water. Put the scrubber INSIDE the lung and the scrubber will not need to be built watertight. In fact, the scrubber could be one of the simplest types ever made, open on one end, which would make it lighter and cheaper and easier to build. Put the scrubber inside the lung and accomplish several of the design criteria in one fell swoop.
THE PARTICULARS
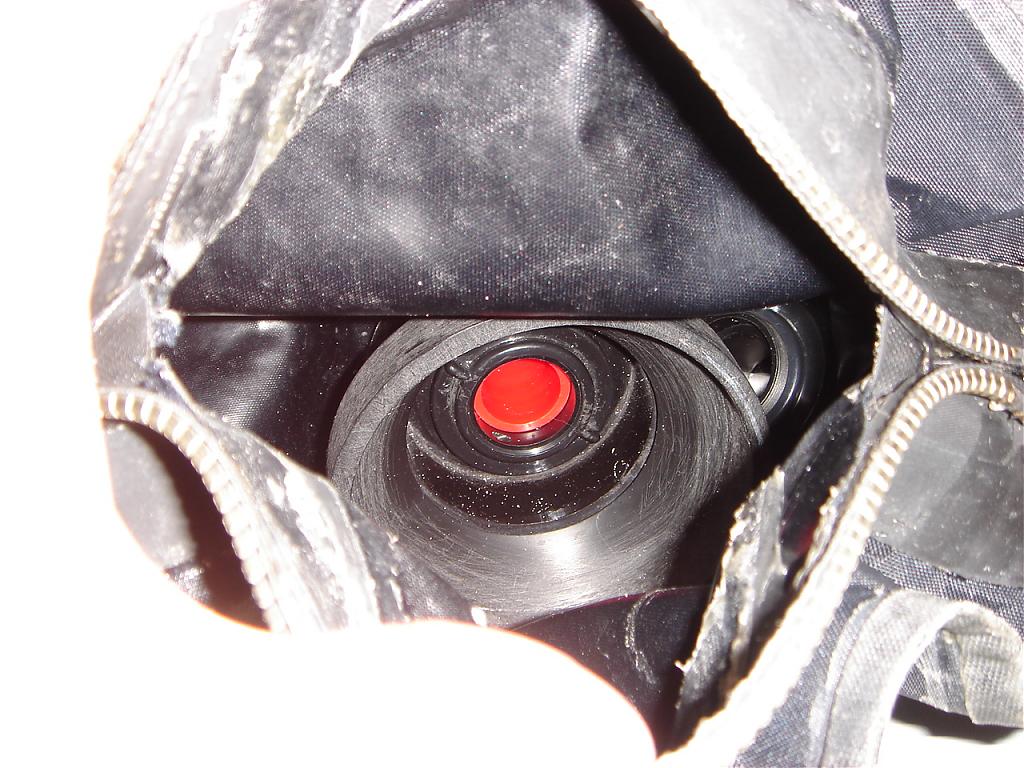
My Wife says get down to it already. A dry suit zipper is used to access the scrubber. Although expensive, the zipper has proven to be most practical because it is easy to operate and does not leak. Drager hoses and DSV were used as well as a Drager dosage unit. Both of these are from the Ray. The hoses were cut to make them shorter and the elbows were also used. In pure O2 mode, the dosage unit supplies 100% oxygen through a 50 % orifice that has had the little hole filled. This has turned the dosage unit into nothing more than a demand second stage. In mixed gas mode the dosage unit will supply the diluent in the same manner. Currently three p-
THE SCRUBBER
The scrubber is made of four inch diameter PVC pipe and the screens are the drainage ones made for that type of pipe. Inside the lung is a four inch to three inch coupler and attached to the coupler is a rubber cap that the exhale hose p-
ALMOST THE END
I hope that you have enjoyed reading this post and I hope it was worth your time. I would like to thank everyone who has posted interesting information on this wonderful site. I thank you because I probably used it to get my project this far. Posting all this is my way of saying thanks. I have particularly enjoyed posts by Dave Sutton, customworks, JAAP, Paul with the REVO, and there are just too many more to list. I would like to thank my good friends, in no particular order: Thom Susko (seabass) and Dave Zebell (dz3866). Without their help this project would not have been possible.
I welcome your comments, both good and bad. I will try to get back to you. If you all would like I will keep you informed of the progress that is being made as major stuff gets finished. If you would like to build a MINA I would be happy to help you. If you would like me to build parts of one for you or the whole thing I can but I have to be compensated for my time as I work other jobs. If you would like to see the MINA and perhaps dive it I am planning on going to the DEMA show this year and will be bringing it along. Let me know if you will be attending and we can meet up. Dont stop working on those projects! I am going to be sad when mine are done! The End of the beginning...
P.S. to see more photos go to Mina MK I photos in the homebuilders forum
RBW 30.11.2010
This rig and I have been through some rough times. In 2008 I decided to take it out for an entire week in the worst conditions you can imagine for the sole purpose of testing it. Huge Laguna Beach swells came in for about five days and youve got to visit Laguna Beach, CA when a swell hits to appreciate what I mean by raw power. Well, the beaches were closed all week for swimming and diving but I figured it was the best time to find out if this thing was as tough as I was saying it was so I snuck past the lifeguards for five consequtive days and went for it alone. I am going to humbly admit that I will never do that again. I felt I was never going to get to shore again more than once. The bubbles from the crashing waves overhead were at times extending down past 20 feet. I would be sitting there being scraped along the rocky bottom in the surge and then all of sudden-
On the fifth day, the final day, I had had enough. I struggled hard for twenty-
I hope no one reading this thinks that I am writing it to try and make myself look macho or tough or something. I was scared to death. But, the MK I, which had been totally abused, being scraped, dragged and banged every day held together without a failure. However, two times during that week I overbreathed the scrubber and felt that panic feeling that a CO2 hit produces. I hate that feeling. When it happened the second time I felt like no air was coming to me even though I was breathing and had oxygen in the bottle. I had no choice but to surface and head far out past the breakers and just sit there riding the swells up and down till I was calm enough to go back down and attempt to get through the surf again. I was glad I had a BC then.
In an attempt to build a rig as small as possible I built a scrubber that is not large enough to handle this sort of stressful diving. However, in the years since I have not had a breakthrough and this is because I dive in calm conditions and therefore my breathing rate is more controlled. A scrubber of this size works ok under these conditions. I am putting this all down to assist any homebuilders out there who may be building scrubbers with approximately twenty square inches of lime in their design.
On a final note, the MK I is being retired. The MK II is a modernized version of the MK I and I expect it to work well for the next few years. If you would like more information about the MK II, or the back-
Well, thats about it. My buddies and I are continuing to experiment with new ideas and we are going diving this week together. Ive had the greatest time working with them on our projects. As I look at the old scratched up MK I, I remember those terrible days in the waves. Now I am looking at the MK II with the soft-